# 1. Projekt-Setup
Zuerst müssen wir Bibliotheken laden. Stellen Sie sicher, dass alle richtig installiert sind. Außerdem verwende ich Python 3.12.3.
## 1.1 Load libraries# If that you must set up any library, run under:
# pip set up library1 library2 library3 ...
# Fundamental Libraries
import os # For file operations
import gc # For rubbish assortment, it avoids RAM reminiscence points
import numpy as np # For coping with matrices
import pandas as pd # For coping with dataframes
import janitor # For information cleansing (primarily column names)
import numexpr # For quick pd.question() manipulation
import inflection # For string manipulation
import unidecode # For string manipulation
# Geospatial Libraries
import geopandas as gpd # For coping with shapefiles
import pyogrio # For quick .gpkg file manipulation
import ee # For Google Earth Engine API
import contextily as ctx # For basemaps
import folium # For interactive maps
# Shapely Objects and Geometry Manipulation
from shapely.geometry import mapping, Polygon, Level, MultiPolygon, LineString # For geometry manipulation
# Raster Information Manipulation and Visualization
import rasterio # For raster manipulation
from rasterio.masks import masks # For raster information manipulation
from rasterio.plot import present # For raster information visualization
# Plotting and Visualization
import matplotlib.pyplot as plt # For plotting and information visualization
from matplotlib.colours import ListedColormap, Normalize # For colour manipulation
import matplotlib.colours as colours # For colour manipulation
import matplotlib.patches as mpatches # For creating patch objects
import matplotlib.cm as cm # For colormaps
# Information Storage and Manipulation
import pyarrow # For environment friendly information storage and manipulation
# Video Making
from moviepy.editor import ImageSequenceClip # For creating movies (part 4.7 solely) - test this when you have points: https://github.com/kkroening/ffmpeg-python
Stellen Sie dann sicher, dass Sie einen Ordner für dieses Projekt haben. Alle Ressourcen und Ausgaben werden dort gespeichert. Dieser Ordner kann sich auf Ihrem lokalen Laufwerk, einer Cloud-basierten Speicherlösung oder in einem bestimmten Ordner auf Google Drive befinden, wo Sie die mit der GEE-API abgerufenen Raster speichern.
Achten Sie beim Ausführen Ihres Codes darauf, die unten stehende Adresse in Ihren Projektpfad zu ändern. Home windows-Benutzer sollten immer daran denken, statt / zu verwenden.
# 1.2 Set working listing
project_path = 'path_to_your_project_folder' # The place you'll save all outcomes and sources have to be in
os.chdir(project_path) # All sources on the undertaking are relative to this path# 1.3 Additional settings
pd.set_option('compute.use_numexpr', True) # Use numexpr for quick pd.question() manipulation
Schließlich ist diese Funktion nützlich, um Geometrien über OpenStreetMap (OSM) zu plotten. Sie ist besonders hilfreich, wenn Sie mit unbekannten Shapefiles arbeiten, um Genauigkeit sicherzustellen und Fehler zu vermeiden.
## 1.4 Set operate to plot geometries over an OSM
def plot_geometries_on_osm(geometries, zoom_start=10):# Calculate the centroid of all geometries to middle the map
centroids = (geometry.centroid for geometry in geometries)
avg_x = sum(centroid.x for centroid in centroids) / len(centroids)
avg_y = sum(centroid.y for centroid in centroids) / len(centroids)
# Create a folium map centered across the common centroid
map = folium.Map(location=(avg_y, avg_x), zoom_start=zoom_start)
# Add every geometry to the map
for geometry in geometries:
geojson = mapping(geometry) # Convert the geometry to GeoJSON
folium.GeoJson(geojson).add_to(map)
return map
# 2. Einzelnes Beispiel: Acrelândia (AC) im Jahr 2022
Als Beispiel, um eine Instinct für den Prozess zu schaffen, werden wir Land sparen, reinigen und die Nutzung planen in Acrelândia (AC) im Jahr 2022. Es ist eine Stadt mitten im AMACRO Area (die Dreistaatengrenze von BinAzonaten, Wechselstromre, und Rondônia), wo der oft unberührte Wald rapide zerstört wird.
In diesem Abschnitt werde ich das Skript Schritt für Schritt erklären und dann den Prozess standardisieren, um es für mehrere Orte über mehrere Jahre auszuführen. Da das Speichern großer Raster mithilfe der API ein langsamer Prozess sein kann, empfehle ich, es nur zu verwenden, wenn Sie sich über mehrere Jahre mit wenigen oder kleinen Gebieten befassen müssen. Das Speichern großer Gebiete auf Google Drive kann Stunden dauern, daher empfehle ich, die großen LULC-Dateien für das ganze Land herunterzuladen und sie dann zu bereinigen, wie wir es in einem zukünftigen Beitrag tun werden.
Um den Code auszuführen, laden Sie zunächst IBGE’s¹ herunter und speichern Sie es Shapefiles für brasilianische Städte (Wählen Sie Brasilien > Gemeinden). Denken Sie daran, dass Sie für diesen Algorithmus jedes beliebige Shapefile in Brasilien verwenden können.
## 2.1 Get the geometry of the realm of curiosity (Acrelândia, AC)
brazilian_municipalities = gpd.read_file('municipios/file.shp', engine='pyogrio', use_arrow=True) # Learn the shapefile - you should utilize every other shapefile right here. Shapefiles have to be in your undertaking folder, as set in 1.2
brazilian_municipalities = brazilian_municipalities.clean_names() # Clear the column names (take away particular characters, areas, and so on.)
brazilian_municipalities.crs = 'EPSG:4326' # Set the CRS to WGS84 (MapBiomas makes use of this CRS)
brazilian_municipalities
## 2.2 Get geometry for Acrelândia, AC
metropolis = brazilian_municipalities.question('nm_mun == "Acrelândia"') # Filter the geometry for Acrelândia, AC (could be every other metropolis or set of cities)
city_geom = metropolis.geometry.iloc(0) # Get the geometry of Acrelândia, AC
city_geom # See the geometry form
Sobald wir das Shapefile, das wir untersuchen möchten, ordnungsgemäß gespeichert haben, erstellen wir einen Begrenzungsrahmen darum, um das vollständige Raster von MapBiomas zuzuschneiden. Dann speichern wir es in der GEE Python API.
## 2.3 Set the bounding field (bbox) for the realm of curiosity
bbox = city_geom.bounds # Get the bounding field of the geometry
bbox = Polygon(((bbox(0), bbox(1)), (bbox(0), bbox(3)), (bbox(2), bbox(3)), (bbox(2), bbox(1)))) # Convert the bounding field to a Polygonbbox_xmin = bbox.bounds(0) # Get the minimal x coordinate of the bounding field
bbox_ymin = bbox.bounds(1) # Get the minimal y coordinate of the bounding field
bbox_xmax = bbox.bounds(2) # Get the utmost x coordinate of the bounding field
bbox_ymax = bbox.bounds(3) # Get the utmost y coordinate of the bounding field
bbox # See bbox round Acrelândia form
# Plot the bounding field and the geometry of Acrelandia over an OSM map
plot_geometries_on_osm((bbox, city_geom), zoom_start=10)

Jetzt greifen wir auf die MapBiomas Google Earth Engine API zu. Zuerst müssen wir Erstellen Sie ein Cloud-Projekt auf GEE Verwenden Sie ein Google-Konto. Stellen Sie sicher, dass auf Ihrem Google Drive-Konto genügend Speicherplatz vorhanden ist.
Dann müssen wir die GEE Python API (nur einmal). Wenn Sie ein VSCode-Benutzer sind, beachten Sie, dass das Token-Einfügefeld in der oberen rechten Ecke der IDE angezeigt wird.
Alle Bilder aus der MapBiomas LULC-Sammlung sind im selben Asset verfügbar. Beachten Sie, dass Sie dieses Skript leicht modifizieren können, um mit anderen Belongings im GEE-Katalog und andere MapBiomas-Sammlungen.
## 2.4 Acess MapBiomas Assortment 8.0 utilizing GEE API
# import ee - already imported at 1.1ee.Authenticate() # Just for the primary time
ee.Initialize() # Run it each time you begin a brand new session
# Outline the MapBiomas Assortment 8.0 asset ID - retrieved from https://brasil.mapbiomas.org/en/colecoes-mapbiomas/
mapbiomas_asset = 'tasks/mapbiomas-workspace/public/collection8/mapbiomas_collection80_integration_v1'
asset_properties = ee.information.getAsset(mapbiomas_asset) # Examine the asset's properties
asset_properties # See properties
Hier stellt jedes Band die LULC-Daten für ein bestimmtes Jahr dar. Stellen Sie sicher, dass der folgende Code richtig geschrieben ist. Dadurch wird das Bild für das gewünschte Jahr ausgewählt und dann das Rohraster für einen Begrenzungsrahmen um die Area von Interesse (ROI) – Acrelândia, AC – zugeschnitten.
## 2.5 Filter the gathering for 2022 and crop the gathering to a bbox round Acrelândia, AC
yr = 2022
band_id = f'classification_{yr}' # bands (or yearly rasters) are named as classification_1985, classification_1986, ..., classification_2022mapbiomas_image = ee.Picture(mapbiomas_asset) # Get the photographs of MapBiomas Assortment 8.0
mapbiomas2022 = mapbiomas_image.choose(band_id) # Choose the picture for 2022
roi = ee.Geometry.Rectangle((bbox_xmin, bbox_ymin, bbox_xmax, bbox_ymax)) # Set the Area of Curiosity (ROI) to the bbox round Acrelândia, AC - set in 2.3
image_roi = mapbiomas2022.clip(roi) # Crop the picture to the ROI
Jetzt speichern wir das zugeschnittene Raster auf Google Drive (in meinem Fall im Ordner „tutorial_mapbiomas_gee“). Stellen Sie sicher, dass Sie vor dem Ausführen den Zielordner auf Ihrem Laufwerk erstellt haben.
Ich habe versucht, es lokal zu speichern, aber es sieht so aus, als müssten Sie GEE-Raster bei Google Drive speichern (sagen Sie mir Bescheid, wenn Sie wissen, wie das lokal geht). Dies ist der zeitaufwändigste Teil des Codes. Bei großen ROIs kann dies Stunden dauern. Überprüfen Sie Ihren GEE-Activity-Supervisor, um zu sehen, ob die Raster ordnungsgemäß in den Zielordner geladen wurden.
## 2.6 Export it to your Google Drive (guarantee you could have house there and that it's correctly arrange)# Obs 1: Recall that you must authenticate the session, because it was completed on 2.4
# Obs 2: Guarantee you could have sufficient house on Google Drive. Free model solely offers 15 Gb of storage.
export_task = ee.batch.Export.picture.toDrive(
picture=image_roi, # Picture to export to Google Drive as a GeoTIFF
description='clipped_mapbiomas_collection8_acrelandia_ac_2022', # Activity description
folder='tutorial_mapbiomas_gee', # Change this to the folder in your Google Drive the place you wish to save the file
fileNamePrefix='acrelandia_ac_2022', # File title (change it if you wish to)
area=roi.getInfo()('coordinates'), # Area to export the picture
scale=30,
fileFormat='GeoTIFF'
)
# Begin the export job
export_task.begin()
# 3. Zeichnen Sie die Karte
Jetzt haben wir ein Raster mit LULC-Daten für einen Begrenzungsrahmen um Acrelândia im Jahr 2022. Dieses ist unter der folgenden Adresse (bei Google Drive) gespeichert. Sehen wir uns zunächst an, wie es aussieht.
## 3.1 Plot the orginal raster over a OSM
file_path = 'path_of_exported_file_at_google_drive.tif' # Change this to the trail of the exported file# Plot information
with rasterio.open(file_path) as src:
information = src.learn(1)
print(src.meta)
print(src.crs)
present(information)

In MapBiomas LULC Assortment 8 stellt jedes Pixel einen bestimmten Landnutzungstyp dar, gemäß diese Liste. Beispielsweise bedeutet „3“ „Natürlicher Wald“, „15“ „Weide“ und „0“ „Keine Daten“ (Pixel im Raster liegen nicht innerhalb der brasilianischen Grenzen).
Wir werden die vorhandenen Daten untersuchen, bevor wir sie grafisch darstellen.
## 3.2 See distinctive values
unique_values = np.distinctive(information)
unique_values # Returns distinctive pixels values within the raster# 0 = no information, components of the picture outdoors Brazil
## 3.3 See the frequency of every class (besides 0 - no information)
unique_values, counts = np.distinctive(information(information != 0), return_counts=True) # Get the distinctive values and their counts (besides zero)
pixel_counts = pd.DataFrame({'worth': unique_values, 'depend': counts})
pixel_counts('share') = (pixel_counts('depend') / pixel_counts('depend').sum())*100
pixel_counts

Letztendlich arbeiten wir mit einer großen Matrix, in der jedes Component darstellt, wie jedes winzige 30 x 30 m große Stück Land genutzt wird.
## 3.4 See the precise raster (a matrix wherein every factor represents a pixel worth - land use code on this case)
information
Jetzt müssen wir unsere Rasterdaten organisieren. Anstatt jedes Pixel nach der genauen Landnutzung zu kategorisieren, kategorisieren wir sie breiter. Wir unterteilen die Pixel in natürlicher Wald, natürliche nicht-waldartige Vegetation, Wasser, Weideland, LandwirtschaftUnd andere Nutzungen. Insbesondere sind wir daran interessiert, die Umwandlung von natürlichem Wald in Weideland zu verfolgen. Um dies zu erreichen, werden wir Pixelwerte basierend auf den mapbiomas_categories dict unten, gefolgt von der Kategorisierung der Landnutzung und Landbedeckung (LULC) von MapBiomas.
Der folgende Code schneidet das Raster auf die Grenzen von Acrelândia zu und weist die Pixel entsprechend den mapbiomas_categories dict. Anschließend wird es als neues Raster unter „reassigned_raster_path“ gespeichert. Beachten Sie, dass das alte Raster auf Google Drive gespeichert wurde (nachdem es mithilfe der GEE-API heruntergeladen wurde), während das neue im Projektordner gespeichert wird (in meinem Fall ein OneDrive-Ordner auf meinem PC, wie in Abschnitt 1.2 festgelegt). Von hier an verwenden wir nur noch das neu zugewiesene Raster, um die Daten darzustellen.
Dies ist der Hauptteil des SkriptsWenn Sie Zweifel daran haben, was hier passiert (Zuschneiden für Acrelândia und anschließendes Neuzuweisen von Pixeln zu breiteren Kategorien), empfehle ich, es auszuführen und die Ergebnisse für jeden Schritt auszudrucken.
mapbiomas_categories = {
# Forest (= 3)
1:3, 3:3, 4:3, 5:3, 6:3, 49:3, # That's, values 1, 3, 4, 5, 6, and 49 can be reassigned to three (Forest)
# Different Non-Forest Pure Vegetation (= 10)
10:10, 11:10, 12:10, 32:10, 29:10, 50:10, 13:10, # That's, values 10, 11, 12, 32, 29, 50, and 13 can be reassigned to 10 (Different Non-Forest Pure Vegetation)
# Pasture (= 15)
15:15,
# Agriculture (= 18)
18:18, 19:18, 39:18, 20:18, 40:18, 62:18, 41:18, 36:18, 46:18, 47:18, 35:18, 48:18, 21:18, 14:18, 9:18, # That's, values 18, 19, 39, 20, 40, 62, 41, 36, 46, 47, 35, 48, 21, 14, and 9 can be reassigned to 18 (Agriculture)
# Water ( = 26)
26:26, 33:26, 31:26, # That's, values 26, 33, and 31 can be reassigned to 26 (Water)
# Different (= 22)
22:22, 23:22, 24:22, 30:22, 25:22, 27:22, # That's, values 22, 23, 24, 30, 25, and 27 can be reassigned to 22 (Different)
# No information (= 255)
0:255 # That's, values 0 can be reassigned to 255 (No information)
}
## 3.5 Reassing pixels values to the MapBiomas customized normal classes and crop it to Acrelandia, AC limits
original_raster_path = 'path_to_your_google_drive/tutorial_mapbiomas_gee/acrelandia_ac_2022.tif'
reassigned_raster_path = 'path_to_reassigned_raster_at_project_folder' # Someplace within the undertaking folder set at 1.2with rasterio.open(original_raster_path) as src:
raster_array = src.learn(1)
out_meta = src.meta.copy() # Get metadata from the unique raster
# 3.5.1. Crop (or masks) the raster to the geometry of city_geom (on this case, Acrelandia, AC) and thus take away pixels outdoors the town limits (can be assigned to no information = 255)
out_image, out_transform = rasterio.masks.masks(src, (city_geom), crop=True)
out_meta.replace({
"peak": out_image.form(1),
"width": out_image.form(2),
"rework": out_transform
}) # Replace metadata to the brand new raster
raster_array = out_image(0) # Get the masked raster
modified_raster = np.zeros_like(raster_array) # Base raster stuffed with zeros to be modified
# 3.5.2. Reassign every pixel based mostly on the mapbiomas_categories dictionary
for original_value, new_value in mapbiomas_categories.objects():
masks = (raster_array == original_value) # Create a boolean masks for the unique worth (True = Substitute, False = Do not exchange)
modified_raster(masks) = new_value # Substitute the unique values with the brand new values, when wanted (that's, when the masks is True)
out_meta = src.meta.copy() # Get metadata from the unique raster
out_meta.replace(dtype=rasterio.uint8, depend=1) # Replace metadata to the brand new raster
with rasterio.open(reassigned_raster_path, 'w', **out_meta) as dst: # Write the modified raster to a brand new file on the reassigned_raster_path
dst.write(modified_raster.astype(rasterio.uint8), 1)
## 3.6 See the frequency of pixels within the reassigned raster
with rasterio.open(reassigned_raster_path) as src:
raster_data = src.learn(1)
unique_values = np.distinctive(raster_data)
total_non_zero = np.sum(raster_data != 255) # Rely the whole variety of non-zero pixelsfor worth in unique_values:
if worth != 255:  # Exclude no information (= 255)
depend = np.sum(raster_data == worth) # Rely the variety of pixels with the worth
share = depend / total_non_zero # Calculate the share of the worth
share = share.spherical(3) # Spherical to three decimal locations
print(f"Worth: {worth}, Rely: {depend}, Share: {share}")

Jetzt stellen wir die Daten mit allgemeinen Farben dar. Wir werden die Karte später verbessern, aber dies ist nur ein erster (oder zweiter?) Blick. Beachten Sie, dass ich 255 (= keine Daten, Pixel außerhalb von Acrelândia) zur besseren Visualisierung speziell auf Weiß eingestellt habe.
## 3.7 Plot the reassigned raster with generic colours
with rasterio.open(reassigned_raster_path) as src:
information = src.learn(1) # Learn the raster information
unique_values = np.distinctive(information) # Get the distinctive values within the rasterplt.determine(figsize=(10, 8)) # Set the determine dimension
cmap = plt.cm.viridis # Utilizing Viridis colormap
norm = Normalize(vmin=information.min(), vmax=26) # Normalize the information to the vary of the colormap (max = 26, water)
masked_data = np.ma.masked_where(information == 255, information) # Masks no information values (255)
plt.imshow(masked_data, cmap=cmap, norm=norm) # Plot the information with the colormap
plt.colorbar(label='Worth') # Add a colorbar with the values
plt.present()

Jetzt ist es Zeit, eine schöne Karte zu erstellen. Ich habe Matplotlib gewählt, weil ich statische Karten möchte. Wenn Sie interaktive Choroplethen bevorzugen, können Sie verwenden Handlung.
Weitere Einzelheiten zu Choroplethen mit Matplotlib finden Sie unter seine Dokumentation, GeoPandas-Leitfadenund der große Yan Holtz Python-Graphgalerie — wo ich viel Inspiration und Werkzeuge für DataViz in Python bekomme. Auch für schöne Farbpaletten, Coolors.co ist eine ausgezeichnete Ressource.
Stellen Sie sicher, dass Sie alle Datenvisualisierungsbibliotheken richtig geladen haben, um den folgenden Code auszuführen. Ich habe auch versucht, die Reihenfolge der Patches zu ändern, aber ich wusste nicht, wie das geht. Sagen Sie mir Bescheid, wenn Sie herausfinden, wie es geht.
## 3.8 Plot the reassigned raster with customized colours# Outline the colours for every class - discover that you must comply with the identical order because the values and have to be numerically rising or lowering (nonetheless have to learn how to resolve it)
values = (3, 10, 15, 18, 22, 26, 255) # Values to be coloured
colors_list = ('#6a994e', '#a7c957', '#c32f27', '#dda15e', '#6c757d', '#0077b6','#FFFFFF') # HEX codes of the colours used
labels = ('Pure Forest', 'Different Pure Vegetation', 'Pasture', 'Agriculture', 'Others', 'Water', 'No information') # Labels displayed on the legend
cmap = colours.ListedColormap(colors_list) # Create a colormap (cmap) with the colours
bounds = values + (256) # Add a worth to the tip of the checklist to incorporate the final colour
norm = colours.BoundaryNorm(bounds, cmap.N) # Normalize the colormap to the values
img = plt.imshow(raster_data, interpolation='nearest', cmap=cmap, norm=norm) # Plot the information with the colormap
legend_patches = (mpatches.Patch(colour=colors_list(i), label=labels(i)) for i in vary(len(values)-1)) # Create the legend patches withou the final one (255 = no information)
# Create the legend
plt.legend(handles = legend_patches, # Add the legend patches
bbox_to_anchor = (0.5, -0.02), # Place the legend under the plot
loc = 'higher middle', # Place the legend within the higher middle
ncol = 3, # Variety of columns
fontsize = 9, # Font dimension
handlelength=1,# Size of the legend handles
frameon=False) # Take away the body across the legend
plt.axis('off') # Take away the axis
plt.title('Land Use in Acrelândia, AC (2022)', fontsize=20) # Add title
plt.savefig('figures/acrelandia_ac_2022.pdf', format='pdf', dpi=1800) # Reserve it as a PDF on the figures folder
plt.present()

4. Standardisierte Funktionen
Nachdem wir nun ein Gespür dafür entwickelt haben, wie man MapBiomas LULC-Raster herunterlädt, speichert, bereinigt und plottet, ist es an der Zeit, den Prozess verallgemeinern.
In diesem Abschnitt definieren wir Funktionen, um diese Schritte für jede Kind und jedes Jahr zu automatisieren. Dann führen wir diese Funktionen in einer Schleife aus, um eine bestimmte Stadt – Porto Acre, AC – von 1985 bis 2022 zu analysieren. Abschließend erstellen wir ein Video, das die LULC-Entwicklung in diesem Gebiet über den angegebenen Zeitraum veranschaulicht.
Speichern Sie zunächst einen Begrenzungsrahmen (bbox) um die Area of Curiosity (ROI). Sie müssen nur die gewünschte Geometrie eingeben und das Jahr angeben. Diese Funktion speichert das bbox-Raster um die ROI in Ihrem Google Drive.
## 4.1 For a generic geometry in any yr, save a bbox across the geometry to Google Drivedef get_mapbiomas_lulc_raster(geom, geom_name, yr, folder_in_google_drive):
ee.Authenticate() # Just for the primary time
ee.Initialize() # Run it each time you begin a brand new session
my_geom = geom
bbox = my_geom.bounds # Get the bounding field of the geometry
bbox = Polygon(((bbox(0), bbox(1)), (bbox(0), bbox(3)), (bbox(2), bbox(3)), (bbox(2), bbox(1)))) # Convert the bounding field to a Polygon
bbox_xmin = bbox.bounds(0) # Get the minimal x coordinate of the bounding field
bbox_ymin = bbox.bounds(1) # Get the minimal y coordinate of the bounding field
bbox_xmax = bbox.bounds(2) # Get the utmost x coordinate of the bounding field
bbox_ymax = bbox.bounds(3) # Get the utmost y coordinate of the bounding field
mapbiomas_asset = 'tasks/mapbiomas-workspace/public/collection8/mapbiomas_collection80_integration_v1'
band_id = f'classification_{yr}'
mapbiomas_image = ee.Picture(mapbiomas_asset) # Get the photographs of MapBiomas Assortment 8.0
mapbiomas_data = mapbiomas_image.choose(band_id) # Choose the picture for 2022
roi = ee.Geometry.Rectangle((bbox_xmin, bbox_ymin, bbox_xmax, bbox_ymax)) # Set the Area of Curiosity (ROI) to the bbox across the desired geometry
image_roi = mapbiomas_data.clip(roi) # Crop the picture to the ROI
export_task = ee.batch.Export.picture.toDrive(
picture=image_roi, # Picture to export to Google Drive as a GeoTIFF
description=f"save_bbox_around_{geom_name}_in_{yr}", # Activity description
folder=folder_in_google_drive, # Change this to the folder in your Google Drive the place you wish to save the file
fileNamePrefix=f"{geom_name}_{yr}", # File title
area=roi.getInfo()('coordinates'), # Area to export the picture
scale=30,
fileFormat='GeoTIFF'
)
export_task.begin() # Discover that importing these rasters to Google Drive could take some time, specifically for big areas
# Take a look at it utilizing Rio de Janeiro in 2022
folder_in_google_drive = 'tutorial_mapbiomas_gee'
rio_de_janeiro = brazilian_municipalities.question('nm_mun == "Rio de Janeiro"')
rio_de_janeiro.crs = 'EPSG:4326' # Set the CRS to WGS84 (this undertaking default one, change if wanted)
rio_de_janeiro_geom = rio_de_janeiro.geometry.iloc(0) # Get the geometry of Rio de Janeiro, RJteste1 = get_mapbiomas_lulc_raster(rio_de_janeiro_geom, 'rio_de_janeiro', 2022, folder_in_google_drive)
Zweitens beschneiden Sie das Raster, sodass nur die Pixel innerhalb der Geometrie enthalten sind, und speichern Sie es als neues Raster.
Ich habe mich entschieden, es auf Google Drive zu speichern, aber Sie können `reassigned_raster_path` ändern, um es woanders zu speichern. Wenn Sie es ändern, achten Sie darauf, den Relaxation des Codes entsprechend zu aktualisieren.
Sie können Pixel auch nach Bedarf neu zuweisen, indem Sie die mapbiomas_categories dict. Die linke Ziffer stellt die ursprünglichen Pixelwerte dar, die rechte die neu zugewiesenen (neuen) Werte.
## 4.2 Crop the raster for the specified geometry
def crop_mapbiomas_lulc_raster(geom, geom_name, yr, folder_in_google_drive):
original_raster_path = f'path_to_your_google_drive/{folder_in_google_drive}/{geom_name}_{yr}.tif'
reassigned_raster_path = f'path_to_your_google_drive/{folder_in_google_drive}/cropped_{geom_name}_{yr}.tif'my_geom = geom
mapbiomas_categories = {
# Forest (= 3)
1:3, 3:3, 4:3, 5:3, 6:3, 49:3,
# Different Non-Forest Pure Vegetation (= 10)
10:10, 11:10, 12:10, 32:10, 29:10, 50:10, 13:10,
# Pasture (= 15)
15:15,
# Agriculture (= 18)
18:18, 19:18, 39:18, 20:18, 40:18, 62:18, 41:18, 36:18, 46:18, 47:18, 35:18, 48:18, 21:18, 14:18, 9:18,
# Water ( = 26)
26:26, 33:26, 31:26,
# Different (= 22)
22:22, 23:22, 24:22, 30:22, 25:22, 27:22,
# No information (= 255)
0:255
} # You'll be able to change this to no matter categorization you need, however simply keep in mind to adapt the colours and labels within the plot
with rasterio.open(original_raster_path) as src:
raster_array = src.learn(1)
out_meta = src.meta.copy() # Get metadata from the unique raster
# Crop the raster to the geometry of my_geom and thus take away pixels outdoors the town limits (can be assigned to no information = 0)
out_image, out_transform = rasterio.masks.masks(src, (my_geom), crop=True)
out_meta.replace({
"peak": out_image.form(1),
"width": out_image.form(2),
"rework": out_transform
}) # Replace metadata to the brand new raster
raster_array = out_image(0) # Get the masked raster
modified_raster = np.zeros_like(raster_array) # Base raster stuffed with zeros to be modified
# Reassign every pixel based mostly on the mapbiomas_categories dictionary
for original_value, new_value in mapbiomas_categories.objects():
masks = (raster_array == original_value) # Create a boolean masks for the unique worth (True = Substitute, False = Do not exchange)
modified_raster(masks) = new_value # Substitute the unique values with the brand new values, when wanted (that's, when the masks is True)
out_meta = src.meta.copy() # Get metadata from the unique raster
out_meta.replace(dtype=rasterio.uint8, depend=1) # Replace metadata to the brand new raster
with rasterio.open(reassigned_raster_path, 'w', **out_meta) as dst: # Write the modified raster to a brand new file on the reassigned_raster_path
dst.write(modified_raster.astype(rasterio.uint8), 1)
teste2 = crop_mapbiomas_lulc_raster(rio_de_janeiro_geom, 'rio_de_janeiro', 2022, folder_in_google_drive)
Jetzt sehen wir die Häufigkeit jedes Pixels im zugeschnittenen, neu zugewiesenen Raster.
## 4.3 Plot the cropped raster
def pixel_freq_mapbiomas_lulc_raster(geom_name, yr, folder_in_google_drive):
reassigned_raster_path = f'path_to_your_google_drive/{folder_in_google_drive}/cropped_{geom_name}_{yr}.tif'with rasterio.open(reassigned_raster_path) as src:
raster_data = src.learn(1)
unique_values = np.distinctive(raster_data)
total_non_zero = np.sum(raster_data != 255) # Rely the whole variety of non-zero pixels
for worth in unique_values:
if worth != 255: # Exclude no information (= 255)
depend = np.sum(raster_data == worth) # Rely the variety of pixels with the worth
share = depend / total_non_zero # Calculate the share of the worth
share = share.spherical(3)
print(f"Worth: {worth}, Rely: {depend}, Share: {share}")
teste3 = pixel_freq_mapbiomas_lulc_raster('rio_de_janeiro', 2022, folder_in_google_drive)
Zuletzt stellen wir es auf einer Karte dar. Sie können die folgenden Argumente ändern, um Eigenschaften wie Farben, Beschriftungen, Legendenposition, Schriftgrößen usw. anzupassen. Außerdem besteht die Möglichkeit, das Format auszuwählen, in dem Sie die Daten speichern möchten (normalerweise PDF oder PNG). PDFs sind schwerer und behalten die Auflösung bei, während PNGs leichter sind, aber eine geringere Auflösung haben.
## 4.4 Plot the cropped raster
def plot_mapbiomas_lulc_raster(geom_name, yr, folder_in_google_drive,driver):
reassigned_raster_path = f'/Customers/vhpf/Library/CloudStorage/GoogleDrive-vh.pires03@gmail.com/My Drive/{folder_in_google_drive}/cropped_{geom_name}_{yr}.tif'
with rasterio.open(reassigned_raster_path) as src:
raster_data = src.learn(1)# Outline the colours for every class - discover that you must comply with the identical order because the values
values = (3, 10, 15, 18, 22, 26, 255) # Have to be the identical of the mapbiomas_categories dictionary
colors_list = ('#6a994e', '#a7c957', '#c32f27', '#dda15e', '#6c757d', '#0077b6','#FFFFFF') # Set your colours
labels = ('Pure Forest', 'Different Pure Vegetation', 'Pasture', 'Agriculture', 'Others', 'Water', 'No information') # Set your labels
cmap = colours.ListedColormap(colors_list) # Create a colormap (cmap) with the colours
bounds = values + (256) # Add a worth to the tip of the checklist to incorporate the final colour
norm = colours.BoundaryNorm(bounds, cmap.N) # Normalize the colormap to the values
img = plt.imshow(raster_data, interpolation='nearest', cmap=cmap, norm=norm) # Plot the information with the colormap
legend_patches = (mpatches.Patch(colour=colors_list(i), label=labels(i)) for i in vary(len(values)-1)) # Create the legend patches with out the final one (255 = no information)
# Create the legend
plt.legend(handles = legend_patches, # Add the legend patches
bbox_to_anchor = (0.5, -0.02), # Place the legend under the plot
loc = 'higher middle', # Place the legend within the higher middle
ncol = 3, # Variety of columns
fontsize = 9, # Font dimension
handlelength=1.5,# Size of the legend handles
frameon=False) # Take away the body across the legend
plt.axis('off') # Take away the axis
geom_name_title = inflection.titleize(geom_name)
plt.title(f'Land Use in {geom_name_title} ({yr})', fontsize=20) # Add title
saving_path = f'figures/{geom_name}_{yr}.{driver}'
plt.savefig(saving_path, format=driver, dpi=1800) # Reserve it as a .pdf or .png on the figures folder of your undertaking
plt.present()
teste4 = plot_mapbiomas_lulc_raster('rio_de_janeiro', 2022, folder_in_google_drive, 'png')
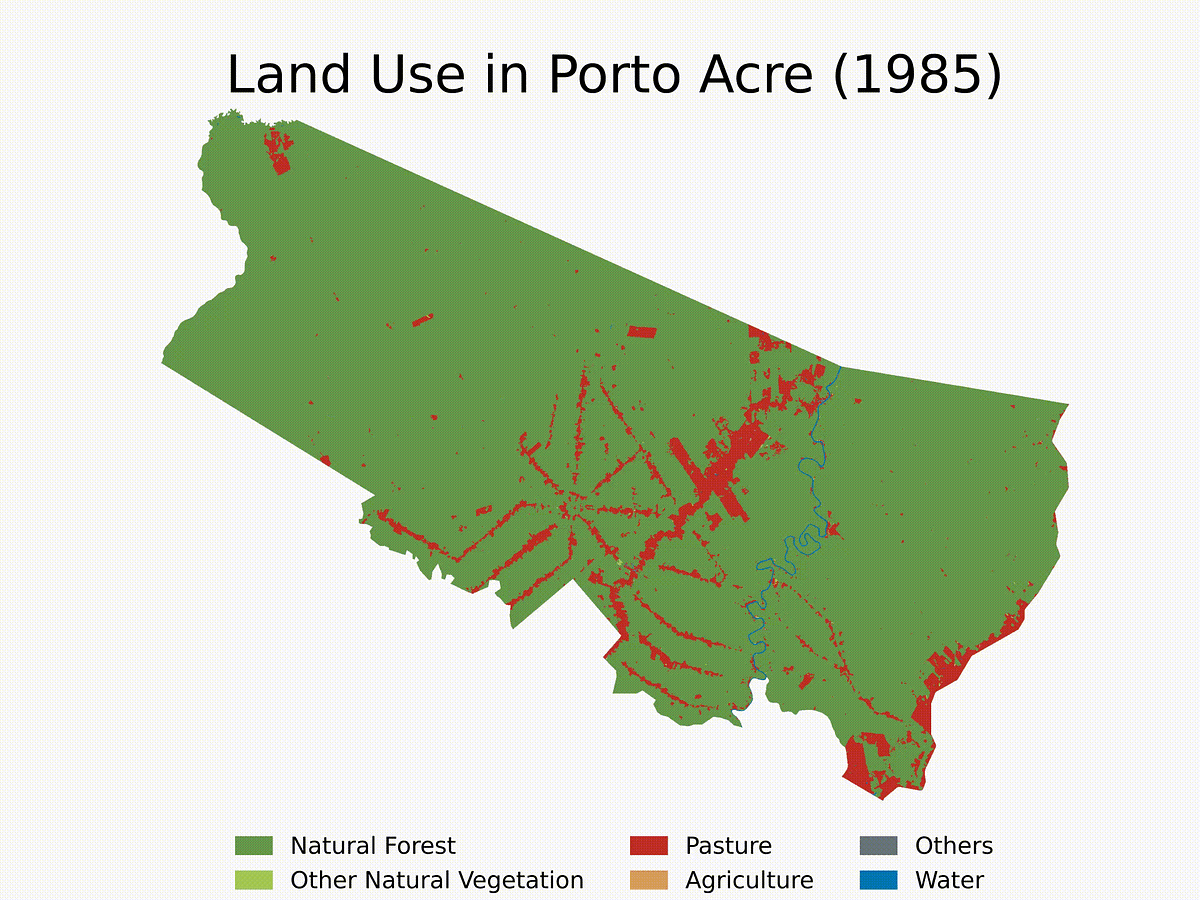
Abschließend finden Sie hier ein Beispiel für die Verwendung der Funktionen und die Erstellung einer Schleife, um die LULC-Entwicklung für Porto Acre (AC) seit 1985 abzurufen. Dies ist eine weitere Stadt in der Area AMACRO mit rasant steigenden Entwaldungsraten.
## 4.5 Do it in only one operate - recall to save lots of rasters (4.1) earlier than
def clean_mapbiomas_lulc_raster(geom, geom_name, yr, folder_in_google_drive,driver):
crop_mapbiomas_lulc_raster(geom, geom_name, yr, folder_in_google_drive)
plot_mapbiomas_lulc_raster(geom_name, yr, folder_in_google_drive,driver)
print(f"MapBiomas LULC raster for {geom_name} in {yr} cropped and plotted!")
## 4.6 Run it for a number of geometries for a number of years### 4.6.1 First, save rasters for a number of geometries and years
cities_list = ('Porto Acre') # Cities to be analyzed - test whether or not there are two cities in Brazil with the identical title
years = vary(1985,2023) # Years to be analyzed (first yr in MapBiomas LULC == 1985)
brazilian_municipalities = gpd.read_file('municipios/file.shp', engine='pyogrio', use_arrow=True) # Learn the shapefile - you should utilize every other shapefile right here
brazilian_municipalities = brazilian_municipalities.clean_names()
brazilian_municipalities.crs = 'EPSG:4326' # Set the CRS to WGS84 (this undertaking default one, change if wanted)
selected_cities = brazilian_municipalities.question('nm_mun in @cities_list') # Filter the geometry for the chosen cities
selected_cities = selected_cities.reset_index(drop=True) # Reset the index
cities_ufs = () # Create checklist to append the total names of the cities with their UF (state abbreviation, in portuguese)
nrows = len(selected_cities)
for i in vary(nrows):
metropolis = selected_cities.iloc(i)
city_name = metropolis('nm_mun')
city_uf = metropolis('sigla_uf')
cities_ufs.append(f"{city_name} - {city_uf}")
folder_in_google_drive = 'tutorial_mapbiomas_gee' # Folder in Google Drive to save lots of the rasters
for metropolis in cities_list:
for yr in years:
city_geom = selected_cities.question(f'nm_mun == "{metropolis}"').geometry.iloc(0) # Get the geometry of the town
geom_name = unidecode.unidecode(metropolis) # Take away latin-1 characters from the town title - GEE doesn`t permit them
get_mapbiomas_lulc_raster(city_geom, geom_name, yr, folder_in_google_drive) # Run the operate for every metropolis and yr
### 4.6.2 Second, crop and plot the rasters for a number of geometries and years - Be sure to have sufficient house in your Google Drive and all rasters are there
for metropolis in cities_list:
for yr in years:
city_geom = selected_cities.question(f'nm_mun == "{metropolis}"').geometry.iloc(0)
geom_name = unidecode.unidecode(metropolis)
clean_mapbiomas_lulc_raster(city_geom, geom_name, yr, folder_in_google_drive,'png') # Run the operate for every metropolis and yr
gc.acquire()
Wir beenden das Tutorial mit einem kurzen Video, das die Entwicklung der Entwaldung in der Gemeinde in den letzten vier Jahrzehnten zeigt. Beachten Sie, dass Sie die Analyse auf mehrere Städte ausweiten und bestimmte Jahre für die Analyse auswählen können. Sie können den Algorithmus nach Bedarf anpassen.
## 4.7 Make a clip with LULC evolution
img_folder = 'figures/porto_acre_lulc' # I created a folder to save lots of the photographs of the LULC evolution for Porto Acre inside project_path/figures
img_files = sorted((os.path.be a part of(img_folder, f) for f in os.listdir(img_folder) if f.endswith('.png'))) # Will get all the photographs within the folder that  finish with .png - ensure you solely have the specified photographs within the folderclip = ImageSequenceClip(img_files, fps=2)  # 2 FPS, 0.5 second between frames
output_file = 'figures/clips/porto_acre_lulc.mp4' # Save clip on the clips folder
clip.write_videofile(output_file, codec='libx264') # It takes some time to create the video (3m30s in my computer)
